maandag, april 28, 2008

Creating DLLs using Visual C++ 8 on GNU/Linux with Wine


Now and then people I work with ask me for a compiled library of some project for the Windows platform. As I dislike working on Windows, I use a MinGW crosscompiler on my GNU/Linux system to compile the code and thus am able to give them what they want.

Unfortunately, AFAIK the MinGW compiler can't generate debugging symbols compatible with Microsoft's compiler, meaning that although they can use the libraries I provide, they can't step through the code using Microsoft's debugger. Which is really annoying.

So, once in a while I figured it might be interesting to get the Visual C++ compiler working from within my GNU/Linux system. This way I would be able to compile everything with the Microsoft compiler and generate compatible debugging info. And as Microsoft has made the compiler free (as in beer not freedom), it's becoming more and more interesting.

I've tried this several times and in the end created a little script to make it easier to run the VC++ compiler. Afterwards I reported it to the Wine AppDB and although it seemed to work fine, I never really started using it, except for some experimentation.

Today, I was trying to figure out how to add support for the Intel C++ compiler to Eclipse/CDT, when I noticed that CDT plugins were already available in the Intel C++ compiler package... So, as I really wanted to play a bit with CDT, I figured I might as well have a look at how to integrate Microsoft's compiler in Eclipse/CDT.

The easiest way to have something workable is using the Eclipse/CDT GNU Make builder. And that's why I started creating a simple makefile which allows me to build Windows executables and libraries using GNU Make on my Ubuntu system. Eclipse/CDT already includes a VC++ output parser, so that part looks rather nicely integrated. The errors and warnings VC++ outputs, get parsed and added to a list of errors on which you can click, which will take you to the corresponding faulty line of code.

So, as I said, I had another go and created a little Makefile to make it a bit easier to create DLL's from GNU/Linux.

Basically, the only thing you need to do before this Makefile works, is install Microsoft Visual C++ Express on your Windows partition, and afterwards copy the followings directories into your Wine directory $HOME/.wine/drive_c/Program Files:

  • c:/Program Files/Microsoft Visual Studio 8/VC/include

  • c:/Program Files/Microsoft Visual Studio 8/VC/lib

  • c:/Program Files/Microsoft Visual Studio 8/VC/bin

  • c:/Program Files/Microsoft Platform SDK for Windows Server 2003 R2/Include

  • c:/Program Files/Microsoft Platform SDK for Windows Server 2003 R2/Lib


You can do this as follows:

mkdir -p $HOME/.wine/drive_c/Program\ Files/Microsoft\ Visual\ Studio\ 8/VC
mkdir -p $HOME/.wine/drive_c/Program\ Files/Microsoft\ Platform\ SDK\ for\ Windows\ Server\ 2003\ R2/

cp -r /mnt/windows/Program\ Files/Microsoft\ Visual\ Studio\ 8/VC/{include,bin,lib} $HOME/.wine/drive_c/Program\ Files/Microsoft\ Visual\ Studio\ 8/VC
cp -r /mnt/windows/Program\ Files/Microsoft\ Platform\ SDK\ for\ Windows\ Server\ 2003\ R2/{Include,Lib} $HOME/.wine/drive_c/Program\ Files/Microsoft\ Platform\ SDK\ for\ Windows\ Server\ 2003\ R2/


The makefile:

MSVC=c:/Program\ Files/Microsoft\ Visual\ Studio\ 8/VC/
MSSDK=c:/Program\ Files/Microsoft\ Platform\ SDK\ for\ Windows\ Server\ 2003\ R2/
INCLUDE=/I${MSVC}include /I${MSSDK}Include
LDFLAGS=/LIBPATH:${MSVC}lib /LIBPATH:${MSSDK}Lib
WINE=/opt/wine-dev/bin/wine
CXX=${WINE} ${MSVC}/bin/cl.exe

EXECUTABLE=main.exe

all: ${EXECUTABLE}

%.obj : %.cpp
$(CXX) /c $(INCLUDE) $<

%.lib : %.obj
${CXX} $^ /link /DLL /out:${@:.lib=.dll} ${LDFLAGS}

%.exe : %.obj
${CXX} $^ /link ${LDFLAGS}

mylib.lib: mylib.obj

${EXECUTABLE}: main.obj mylib.lib

clean:
-rm *.obj *.exe *.dll *.lib *.exp

run:
@${WINE} ${EXECUTABLE}


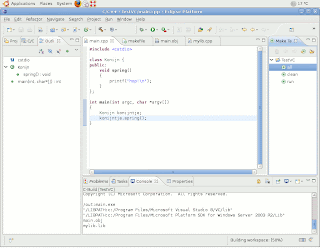
And, finally, there's a screenshot showing Eclipse 3.3.2 with CDT 4.0.3 and Visual C++ 8.0's compiler (version 14.0).

Updated: 2008/04/28 T 09:53.

woensdag, januari 16, 2008

Intro to GDB remote debugging

A tiny introduction to remote debugging using GDB:
http://blip.tv/file/602952

vrijdag, december 14, 2007

Alexander Issaris

This August I became a daddy for the first time. Here are some pics of our little boy...


Debugging the Linux kernel using Eclipse/CDT and Qemu

A screencast demonstrating roughly the same thing is available at: http://blip.tv/file/586651
For iTunes users there's a videopodcast at: http://takis.blip.tv/rss/itunes/

Download the Linux kernel sourcecode from http://www.kernel.org/. For example, the current kernel version is 2.6.23, a direct link would be http://kernel.org/pub/linux/kernel/v2.6/linux-2.6.23.9.tar.bz2

Extract the Linux kernel sourcecode:

cd /usr/local/src
tar xvjf linux-2.6.23.9.tar.bz2

We will build the Linux kernel in a different directory:
mkdir -p /mnt/build/linux-2.6

Then copy the provided kernel configuration into this directory giving it a new name ".config". The following commands will then use this as a base-configuration to start from.


Next, we'll configure the kernel. Just keep pressing enter to use the default answers to all the questions that the kernel configuration program will ask you.

cd /usr/local/src/linux-2.6.23
make oldconfig O=/mnt/build/linux-2.6


Next, make the kernel a bit easier to debug:


make menuconfig O=/mnt/build/linux-2.6


And enable the following options: In the "Kernel hacking" menu enable both "Compile the kernel with debug info" and "Compile the kernel with frame pointers".

Now, we'll fire up Eclipse with the CDT plugin. You can download Eclipse with the CDT plugin from http://www.eclipse.org/downloads/. You'll need to download "Eclipse IDE for C/C++ Developers".


Get rid of the intro screen.

You'll get an empty workspace as shown in the screenshot. First disable automatic building, by using the "Window->Preferences" menu, selecting "General->Workspace" and deselecting "Build automatically". Eclipse will perform a time consuming indexing operation which you can disable by using the "Window->Preferences" menu,  selecting "C/C++->Indexer" and switching from "Fast C/C++ Indexer" to "No Indexer".


Start a new project, by using File->New->Project...

Then select "C Project", "Makefile project", "Empty Project".


Now enter a project name and specify a specific directory for the project sourcecode. To do this, first uncheck the "Use default location" checkbox.


Finally click "Finish".


If you hadn't disabled indexing, Eclipse will now start indexing the Linux kernel sourcecode. This will take a long time.


You'll see a progressbar which might give you an indication on how long it might take to complete.


Eclipse finished indexing the kernel sourcecode. Now, we're ready to configure our debugger. Right-click on the project-name in the left pane (Project explorer) and select "Properties".


We want to modify the default build command and the location where the build files should go.


Uncheck "Use default build command" and enter make CC=gcc-3.4 O=/mnt/build/linux-2.6


Modify the build location by clicking the "File system..." button and browsing to /mnt/build/linux-2.6


Through the menu-bar select "Project->Build all" or press "Ctrl-b".


After some time the Linux kernel build will be completed and you see "bzImage is ready" appear in the Eclipse Console output.


Next, we'll run our kernel binary using the Qemu system emulator. The nice thing about Qemu is that besides the normal virtual HD, floppy and ISO image booting, it can also boot Linux kernels directly. And, Qemu provides a GDB-stub to which we can connect from our Eclipse debugger. The "-s" switch activates this GDB-stub. The "-S" switch makes sure Qemu doesn't start running before we're ready (it freezes the CPU at startup).


Because the CPU is "frozen" at startup, the Qemu window won't show anything useful yet.


Through the menubar, select "Run->Debug Configurations...". Double-click "C/C++ Local Application". Modify the "C/C++ Application" textentry to point to the actual Linux kernel, being /mnt/build/linux-2.6/vmlinux


Click on the "Debugger" tab, and in the "Debugger" listbox select the "gdbserver Debugger". Next, modify the "Stop on startup at:" to "start_kernel". Below this, you'll notice a frame named "Debugger Options"; click the "Connection" tab in this frame and modify the "Type" to "TCP" and the "Port number" to 1234. Continue by clicking the "Debug" button.


Eclipse might compile and link a bit, but will finally launch the debugger and ask if you want to switch to the debugging perspective. Say yes.


The next screenshot shows the debugging perspective. Just like with normal applications, you'll see that the line it is about the execute is highlighted.


In the Qemu window, you'll notice some output already. This is the output which happened in functions preceding the start_kernel() function.


...


By using "Run->Step over" or pressing the "F6" key, you can execute the kernel code line by line and examine what's happening.


If you want to see the assembly instructions which are being executed, you can add a view which displays this by selecting "Windows->Show View->Disassembly".


There's a register view too, as can be seen in the next screenshot. Registers who's contents has been altered by the previous execution step are highlighted in yellow.


You can add breakpoints, inspect variables, inspect memory and much more, but as you keep running the kernel you'll run in trouble as we did not specify a true harddisk image for Qemu. So, you'll get the following output in the Qemu window, because the Linux kernel could not find a root filesystem on our fake harddisk image "/dev/zero".


That's it. Hopefully the above is useful (and fun) for anyone :)


Last updated on 20080108.

donderdag, oktober 05, 2006

Why GIT?

For those of you who do not know what GIT is: GIT is a version control system similar to systems like CVS, Subversion or Bitkeeper.

In short, my four reasons for using GIT are:
  1. Because it is distributed, it allows people to work on projects without having an account
  2. It is really fast
  3. All revisions of every file _are_ always locally available for you to inspect
  4. Easy branching
Distributed

The one thing I adore most about GIT, is that it is a distributed system. Not by itself ofcourse, but this gives you incredible freedom (from a software developers perspective). To explain what is so great about this, I'll illustrate how development used to go with CVS and Subversion and similar systems.

Lets assume you are not a member of the project you want to work on. Then you'd have to check out their code from their software repository, make some changes and then -as you want to get it back and integrated- make a patch and send it to the projects mailinglist.
This doesn't sound that bad. Until you actually start working this way. The problem is that you do not have any versioning system for your own changes. You are working on a read-only repository and have no way to check in small changes.

So, what do some developers do (as I did)? They set up a local repository and import the external projects code. They have write access to that local repository, so they can start make changes while having their changes versioned.

The problem with this approach is that you will most likely want to keep synchronized with the official project sourcecode. So now and then you'd have to try and create a patch and solve lots of conflicts.

So, you'd say, okay, lets synchronise more often, so that the patches keep nice and small, and the conflicts would be easy to fix. Ofcourse, but the problem is that there is no automated way to do this, so it would involve a lot of work.

GIT makes this trivial. With GIT you'd make a clone of the projects repository. Within this clone you can do as you please, as it is your local repository. Now and then (very often) you just pull in the changes from the main project repository and you solve the conflicts that might occur.

How difficult is it to set such an environment up?

git-clone http://your.favorite/project.git

That's it.

Now, you enter the newly created project directory and start hacking and committing your new changes with:

git-commit -a

After a while you want to resynchronize with the main project repository, so you do a:

git-pull

GIT will get all the new code from the main repository, and will try to automatically merge it. If it fails, it will mark the code with the familiar ">>>" markers, as in both CVS and Subversion. After solving the conflicts, you commit again.


Or, you can keep one branch in your own repository identical to the main repository, and create a separate branch for your own development:

git branch mywork

git checkout mywork


Do whatever stuff you want to do in this branch and commits as much as you want to. Afterward you can pull from the main (called master) branch to your branch:

git pull . master

So, this command means that you want GIT to pull in the changes from the master branch into your current branch (being the one you were hacking in).

Speed
Another great benefit of GIT is that it's fast, really fast. I once did a comparison of GIT versus CVS, Subversion, TLA and Bazaar (and possibly others, can't recall). I used the Linux kernel source tree as contents for my revision control systems, and imported the 2.6.0 kernel. Then proceeded committing the 2.6.1 diff, 2.6.2, etc. After going up until 2.6.something, I then made a normalsized patch, and did a commit, GIT was blazingly fast while the other were unworkably slow. Recently Jo Vermeulen did a similar test and published the results on his blog. His tests focus on Bzr being comparable to GIT performancewise.


Full history at your fingertips
The entire sourcecode of the FFmpeg project, with every revision of every file included, fits into 9MiB using GIT. This means that you can have the entire development history of the project on your local harddrive. As it can be stored easily on your harddrive, it is very fast to access, as no calls need to use network connections at all.

Easy branching
Another nice thing about GIT is the ease with which one can create branches. And, in contrary with f.e. SVN and CVS, you feel comfortable to create branches _all the time_. Why? Because
you can delete them whenever you want, and no traces will remain. So, after the following commands, the repository will be the same as before the commands:

git-branch profile
git-branch h264
git-branch -D h264
git-branch -D profile

So, I typically create branches for whatever patch I am about to create. In fact, I actually just start working on something, and if it starts out being something worth keeping, I create a branch and commit the just created codechanges in that newly created branch.

Diffs between branches are easy too:
git diff profile..h264

Pulling in changes from a different branch into the current one:
git pull . somebugfix

Using GIT
If you want to use GIT, you'll better enjoy using the commandline, as the most powerful features are available through the commandline. There are some GUI's available too, mostly for inspecting codechanges.

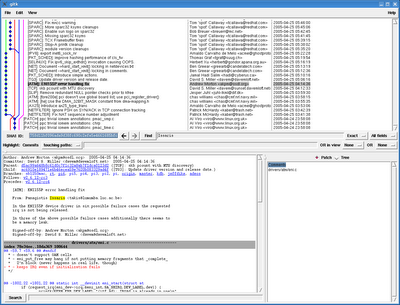
There's a GUI included, called gitk:


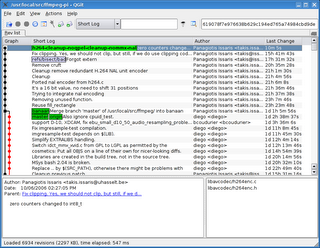
Such as QGit:


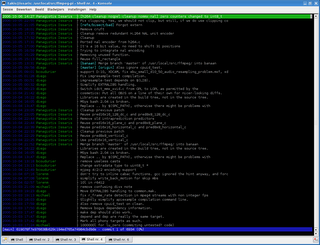
And, for the Curses lovers, tig:


Update: As Uoti Urpala commented on the FFmpeg mailinglist, and as I should have mentioned above, the distributed nature of GIT isn't unique. There are a lot of other distributed revision control systems: Mercurial, Bazaar, Bitkeeper, SVK, TLA/Arch, darcs, ... In fact, I tested a few of those a long time ago, and noticed that performance was suboptimal for some (TLA/Arch and at the time Bazaar - but as I said that was a long time ago) and some seemed a bit immature, others were closed-source and commercial software. So, for me the choice was rather obvious. Recently, I have been told Bazaar has made excellent progress performancewise, so that might be an interesting candidate too. I never really tried Mercurial, although I did have the impression that it might have all the advantages GIT has...

Update2: Jo Vermeulen pointed me to this mail on the Cairo mailinglist where similar advantages concerning GIT are being illustrated.

vrijdag, april 07, 2006

DosBox on Nokia 770


As I am experimenting with videoplayback on the Nokia 770, I had a look at both GTK+ and SDL for this purpose. After a quick hello-world style SDL application, I decided to get something cute running on the device.

I had a quick look at the Maemo Application Wishlist, and saw DosBox. This looked interesting to me, so I had a quick go at getting it up and running on the device. It compiled just fine in Scratchbox.

Several issues showed up. The first being related to SDL screen initialisation: you should always init SDL in 800x480 16 bits per pixel mode, fullscreen, with hardware accelerated SDL surfaces. Second issue was exactly the same as with Google LibJingle: it quickly ran out of memory and got killed by the kernel. Skimming through the sourcecode, followed by a quick hack fixed the first issue, while a swapfile fixed the second (16M swap appears to be enough).

Then as it seemed to work perfectly, I noticed that the virtual keyboard on the N770 was not accessible from within SDL, so I couldn't really do anything in my cute little DosBox :o) Anyways, likely it is possible to let DosBox start an app right from the commandline of an xterminal, and if the DOS application only requires a mouse, it could still be useful :)

Furthermore, DosBox seems to use the Alsa sequencer for MIDI support, that doesn't seem to work either, as there appears to be no sequencer. I haven't looked into this.

The binary is available here. The patch , horrible as it is -remember, it was a quick 2 min hack with grep and sed- is available here: Dosbox ugly N770 patch. It is truly a stupid patch, but as I'm distributing the binary, the GPL requires the availability of the code.

vrijdag, maart 31, 2006

Books

Fiction
Angels and Demons - Dan Brown ***
Digital Fortress - Dan Brown **
The Da Vinci Code - Dan Brown ***
Deception Point - Dan Brown *
Big Fish - Daniel Wallace **
The Last Juror - John Grisham


History

Little Big Man - Thomas Berger **
Baudolino - Umberto Eco ***

Horror

At the Mountains of Madness - H.P. Lovecraft *
The Call of Cthulhu - H.P. Lovecraft *
The Lurking Fear - H.P. Lovecraft ***
The Outsider - H.P. Lovecraft ***
The Statement of Randolph Carter - H.P. Lovecraft
The Thing on the Doorstep - H.P. Lovecraft ***

Science fiction
Day of the Triffids - John Wyndham ***
Crime and Punishment - Fyodor Dostoyevsky ****


Non-fiction

History
The life of Greece - Will and Ariel Durant ****
Caesar and Christ - Will and Ariel Durant ****
The Age of Reason Begins - Will and Ariel Durant ***
The Age of Voltaire - Will and Ariel Durant ***
Rousseau and Revolution - Will and Ariel Durant ***

Other
Stupid White Men - Micheal Moore **
Dude, Where's My Country? - Michael Moore **
Adventures In A TV Nation - Michael Moore *

zondag, februari 26, 2006

FOSDEM 2006


I went to the Free and Open Source Developers European Meeting (FOSDEM) in Brussels this weekend. I attended some quite interesting presentations about Plan9, DTrace and Xen.

Some of these presentation were recorded, and the videos are available for free.

That's me on the picture :) It was taken by a former classmate of mine, Dag, with his Nokia mobile phone.